A group of friends missed Kids Sewing Week last month, so we decided to have our own. But why limit it to just a week? So April has been dubbed Kids Sewing Month, and that seems just perfect timing as we head into a new season where everyone needs new clothes!
This time was all about the School Bus Tee!
A got a geometric pattern with lime green sleeves and an added kangaroo pocket. I originally planned to swipe the pocket from the Nature Walk Pullover, but when I took the pattern out of my library, I realized that it needed some major adjustments since the pullover is much wider and that pocket goes side to side and all the way to the bottom. So I winged the shape, and I think it turned out pretty good.
I fell in love with the fabric for Duckie's when I saw it, so I bought enough to make a few things for her. But in my head, this was the only thing I saw: a tee with a cute little peplum. After putting it together and seeing it on, I may just use the rest of the fabric for more of these in the next sizes up so that she can wear one until she is 4. Which she'd probably enjoy, as she refused to take it off when I put it over her head, side seams unsewn, to check on sizing.
I made hers a bit A line by extending under the arms about half an inch near the notches, which was where I cut off the main body piece. Then I measured that and cut a 4.5" tall rectangle 150% longer for the peplum, which I gathered with 2 rows of basting stitches.
... Then I discovered that Oliver+S's tutorial page has tutorials for both adding a peplum and for switching to A line. Oh well! I haven't looked at them because my methods worked out quite well, and I'm guessing they say basically the same thing!
Showing posts with label A. Show all posts
3.29.2016
School Picture Day
Whew! I decided to make the kids some coordinating outfits for school picture day. Probably a little extra stress than I really needed to take on, but I love seeing them in stuff I made and they like having something special.
I picked up a couple of digital copies, and I can see pros and cons of both. I spent time using InDesign to put the bigger pattern pieces onto ledger size paper so I could use some scrap paper from work and have fewer pieces to tape together. Took some time, but I'm happy with that decision. Plus, I could cram more pieces onto fewer sheets that way.
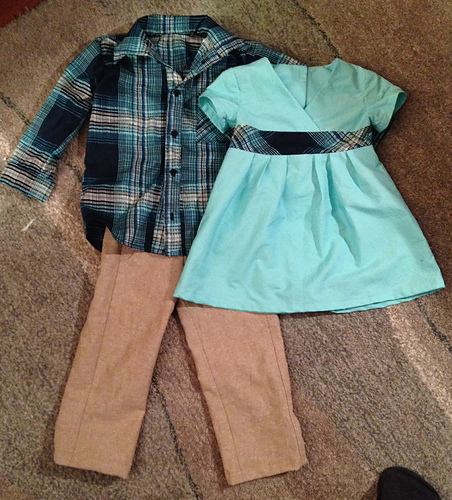
I started off with an Oliver+S Library Dress for Duckie. It seemed like a good choice because I could make the waistband out of a different fabric, so it would be easy to use that same fabric for a shirt for A without them being too matchy-matchy. I was also sold on this tutorial from the O+S blog about using the pattern for knits to mimic a dress from Tea Collection, a dress that I LOOOOVED when A was little and wished to have a girl for. I have plans for at least 2 of these in the future!
The dress went together pretty uneventfully. I read that the buttons weren't necessary for wearing, so I sewed the back bottom half of the dress up on the inside so that I didn't have a whole row of buttons needing to be done up and just sewed the buttons through both layers to fake it. I could have gotten away with doing most or all of them this way, but I think it's easier to have the top 3 open. Fit-wise, I made a 12–18 month, and it's slightly wider on Duckie than I'd prefer, so I'll probably bring it in for the knit ones.
Next up was pants for A, and I went back to the Oliver+S AfterSchool Pants that I'd made him last summer. Last time, they ended up being a bit tight and he got too tall pretty quickly, so I made a size 3T with the length of a 4T by adding to the front and back leg pieces and the sides (I left the yoke alone). I missed something though, because the side panels were a good deal shorter than the fronts and backs, but thankfully not bad enough to be a problem. At least if there HAD been a problem, it wouldn't have meant cutting too much extra, since it'd just be the accent panel.
A seems to really like these, so I see more in my future. They seem to sew up really quickly for all the detailing they have! I'll probably blow his mind sometime by actually using an accent fabric.
For A, I went with the Oliver+S Sketchbook Shirt. I'd picked up the pattern a while back thinking I could make him "handsome shirts" a bit cheaper and with fabrics of my own choosing this way, but hadn't gotten around to using it. I really wish I had. This shirt was almost the death of me. I made the back box pleat backward (I left it). I mixed up the plackets for the fronts and had to rip them out. The collar directions were less clear than most O+S stuff, so I didn't understand what it was talking about until I was too far to go back and do things the way they wanted me to. The sleeves were the easiest part, and setting them in was about the first seam I didn't have to rip out, and that's really saying something, because really, sleeve-setting??? On top of that, I was sticking myself with pins left and right, and I was crying in frustration and fear that A would think I loved Duckie more if I didn't finish his shirt in time. The collar is a little wonky, but A likes it and I finished in time!
I managed to snag a few pictures of them on my own camera, but good luck to me finding the time to get them uploaded here. At least I've got this one of all of the clothes together.
I picked up a couple of digital copies, and I can see pros and cons of both. I spent time using InDesign to put the bigger pattern pieces onto ledger size paper so I could use some scrap paper from work and have fewer pieces to tape together. Took some time, but I'm happy with that decision. Plus, I could cram more pieces onto fewer sheets that way.
I started off with an Oliver+S Library Dress for Duckie. It seemed like a good choice because I could make the waistband out of a different fabric, so it would be easy to use that same fabric for a shirt for A without them being too matchy-matchy. I was also sold on this tutorial from the O+S blog about using the pattern for knits to mimic a dress from Tea Collection, a dress that I LOOOOVED when A was little and wished to have a girl for. I have plans for at least 2 of these in the future!
The dress went together pretty uneventfully. I read that the buttons weren't necessary for wearing, so I sewed the back bottom half of the dress up on the inside so that I didn't have a whole row of buttons needing to be done up and just sewed the buttons through both layers to fake it. I could have gotten away with doing most or all of them this way, but I think it's easier to have the top 3 open. Fit-wise, I made a 12–18 month, and it's slightly wider on Duckie than I'd prefer, so I'll probably bring it in for the knit ones.
Next up was pants for A, and I went back to the Oliver+S AfterSchool Pants that I'd made him last summer. Last time, they ended up being a bit tight and he got too tall pretty quickly, so I made a size 3T with the length of a 4T by adding to the front and back leg pieces and the sides (I left the yoke alone). I missed something though, because the side panels were a good deal shorter than the fronts and backs, but thankfully not bad enough to be a problem. At least if there HAD been a problem, it wouldn't have meant cutting too much extra, since it'd just be the accent panel.
A seems to really like these, so I see more in my future. They seem to sew up really quickly for all the detailing they have! I'll probably blow his mind sometime by actually using an accent fabric.
For A, I went with the Oliver+S Sketchbook Shirt. I'd picked up the pattern a while back thinking I could make him "handsome shirts" a bit cheaper and with fabrics of my own choosing this way, but hadn't gotten around to using it. I really wish I had. This shirt was almost the death of me. I made the back box pleat backward (I left it). I mixed up the plackets for the fronts and had to rip them out. The collar directions were less clear than most O+S stuff, so I didn't understand what it was talking about until I was too far to go back and do things the way they wanted me to. The sleeves were the easiest part, and setting them in was about the first seam I didn't have to rip out, and that's really saying something, because really, sleeve-setting??? On top of that, I was sticking myself with pins left and right, and I was crying in frustration and fear that A would think I loved Duckie more if I didn't finish his shirt in time. The collar is a little wonky, but A likes it and I finished in time!
I managed to snag a few pictures of them on my own camera, but good luck to me finding the time to get them uploaded here. At least I've got this one of all of the clothes together.
Subscribe to:
Posts (Atom)